The book “The Essence of Software Engineering: Applying the SEMAT Kernel”, by Ivar Jacobson, provides a new way of managing software projects. What’s advantageous about it is that it can be used on top of your existing project management techniques. At its core, SEMAT consists of three layers: customer, solution and endeavour. In each of those layers there are “alpha” states. The customer layer consists of an opportunity and stakeholders. The solution layer has requirements and the software system being built. The endeavour layer includes the work, the team and their way of working.
Each “alpha” component of each layer has a checklist to see which progress level it is at. The levels range from 1 to 6 (or fewer depending on the alpha component).
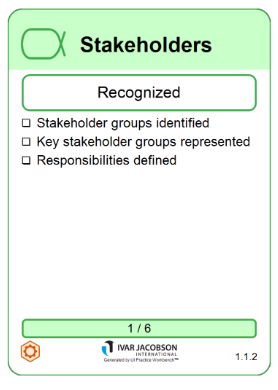
For instance, the stakeholder alpha of the customer layer ranges from level 1 (recognized) to level 6 (satisfied in use).
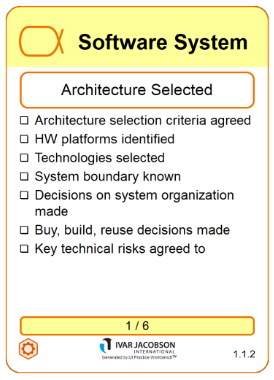
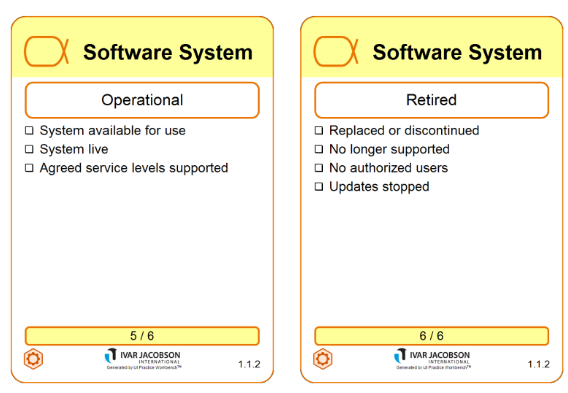
In the project lifecycle, a software system will move through the various levels, starting from an architecture being selected (level 1) to a demonstrable prototype being developed (level 2), to being fully operational (level 5) and then eventually retired (level 6).
You can download the SEMAT kernel cards here to gauge your own project, feature or team.
Alpha States in SEMAT
There are three layers that the Alphas belong to and each one has a different set of progress levels.
Customer layer:
- Opportunity
- Stakeholder
Solution layer:
- Requirements
- Software System
Endeavor layer:
- Work
- Team
- Way of Working
I tried using the appropriate layers to check the health of a small task I was working on and after I was complete, used the SEMAT Kernel levels to see how the health/status had changed.
You Do Not Need to Use Everything in the SEMAT Kernel
Not all Alphas need to be applied. The small task was a new feature for exporting an Excel spreadsheet that I would work on and I had already discussed the specification with the client. Working on it on my own while tasking other team members with other tasks meant that I did not need the “Way of Working” or “Team” Alphas. Since this was only one feature, I would not need the “Software System” or “Stakeholder” Alphas either.
Therefore, the only Alphas/components I needed to check the health of the task were:
- Opportunity
- Requirements
- Work
Example of Using SEMAT
First Health Check of the New Feature
When I first checked, I got the following progress levels:
- Opportunity: viable 4/6
- Requirements: acceptable 4/6
- Work: started 3/6
To be at a certain progress level, I had to go through the short checklist on each card and find one that matched the current status of the project.
The checklist for “Opportunity: viable” is
- A solution has been outlined
- Indications are solution can be developed and deployed within constraints
- Risks are manageable
The checklist for “Requirements: acceptable” is:
- Requirements describe a solution acceptable to the stakeholders
- The rate of change to agreed requirements is low
- Value is clear
The checklist for “Work: started” is:
- Development work has started
- Work progress is monitored
- Work broken down into actionable items with clear definition of done
- Team members are accepting and progressing work items
(You can download the SEMAT kernel cards here to gauge your own project, feature or team)
The client brought up the idea of a new feature and we talked about what was required. I asked some questions to clarify what the client wanted. Those conversations were dealing with the opportunity & requirement Alphas. The client was satisfied with the spec for the new feature, which is why the opportunity was “viable” and the requirements were “acceptable”.
I had already begun to work on the feature, writing unit tests for related functions/classes and installing an additional library for creating Excel spreadsheets. There was a ticket in the ticket system for the feature which included the definition of done for the task. Therefore, I had “started” work.
Second Health Check of the New Feature
After some coding, I finished the feature and it was ready to be deployed to the staging server so that the client could take a look and offer feedback.
I took out the Alpha states cards and did another health check of the feature:
- Opportunity: viable 4/6
- Requirements: addressed 5/6
- Work: concluded 5/6
The checklist for “Opportunity: viable” remained the same as before.
The checklist for “Requirements: addressed” is:
- Enough requirements are implemented for the system to be acceptable
- Stakeholders agree the system is worth making operational
The checklist for “Work: concluded” is:
- Work to produce results have been finished
- Work results are being achieved
- The client has accepted the resulting software system
I implemented the feature according to the specs and at that point, the client needs to test it. This is why the requirements have only been “addressed” and have not yet been fulfilled; there may be bugs or the feature may need more functionality.
The work was “concluded”, since I implemented and tested the feature locally, fixed a few bugs and it worked. I am done working on the feature for now. However, I am waiting for the client to test the feature. That means the work cannot be at the final stage, “closed”.
After the client inspects the result, I expect the health of the feature to be at the final stage for “Opportunity”, “Requirements” and “Work”.
The Advantage of SEMAT
The advantage of SEMAT from this example is that it was flexible. Through this flexibility, I kept track of progress on the Alpha states that I needed. There was no obligation to use all of the Alpha states that the SEMAT software project management framework provides.
It is flexible enough that it was easy to see map the current status of tickets in the ticket system, as you can see in the second health check, the work was concluded; the ticket was marked as “needs testing”.
The flexibility lets you use it with Agile, SCRUM, and other methodologies.